Mobile Hacking Lab Introduction
Mobile Hacking Lab have created a series of free mobile hacking labs to go with their introductory course Android Application Security. This is a walk through of my learning experience and how I solved the first of their labs - Strings.
Strings Brief
Find a hidden flag in the application by investigating the app components and by using dynamic instrumentation.
Outline The challenge will give you a clear idea of how intents and intent filters work on android also you will get a hands-on experience using Frida APIs.
Objective Exploit the application to obtain the flag.
Skills Required
- Understanding of Android app components.
- Familiarity with Frida
- Android reverse engineering.
Workthough (Spoilers)
Setup and Extract the APK
The lab is started in a corellium instance and the vulnerable APK is already installed. I prefer to work offline it also cuts the costs for MHL by not using as much instance time.
I won’t go into too much detail here but download and connect to the corellium OpenVPN. Once connected we can connect to the Android device via ADB.
List the packages using:
adb shell pm list packages -f -3

Now we have found the package we want lets download a copy so we can work with it offline.
adb pull /data/app/xxxxxxxxxxxxxxxxxxx=/com.mobilehackinglab.challenge-xxxxxxxxx==/base.apk

Decode and Identify the Vulnerability
Now we have a copy of the APK we want lets have an explore and see if we can identify any vulnerabilities that could be exploited.
As the APK is encoded we first have to decode it so we can see the manifest file. This can be done using APKTool or JADX. Lets go with JADX as it also decompiles the Java application at the same time.
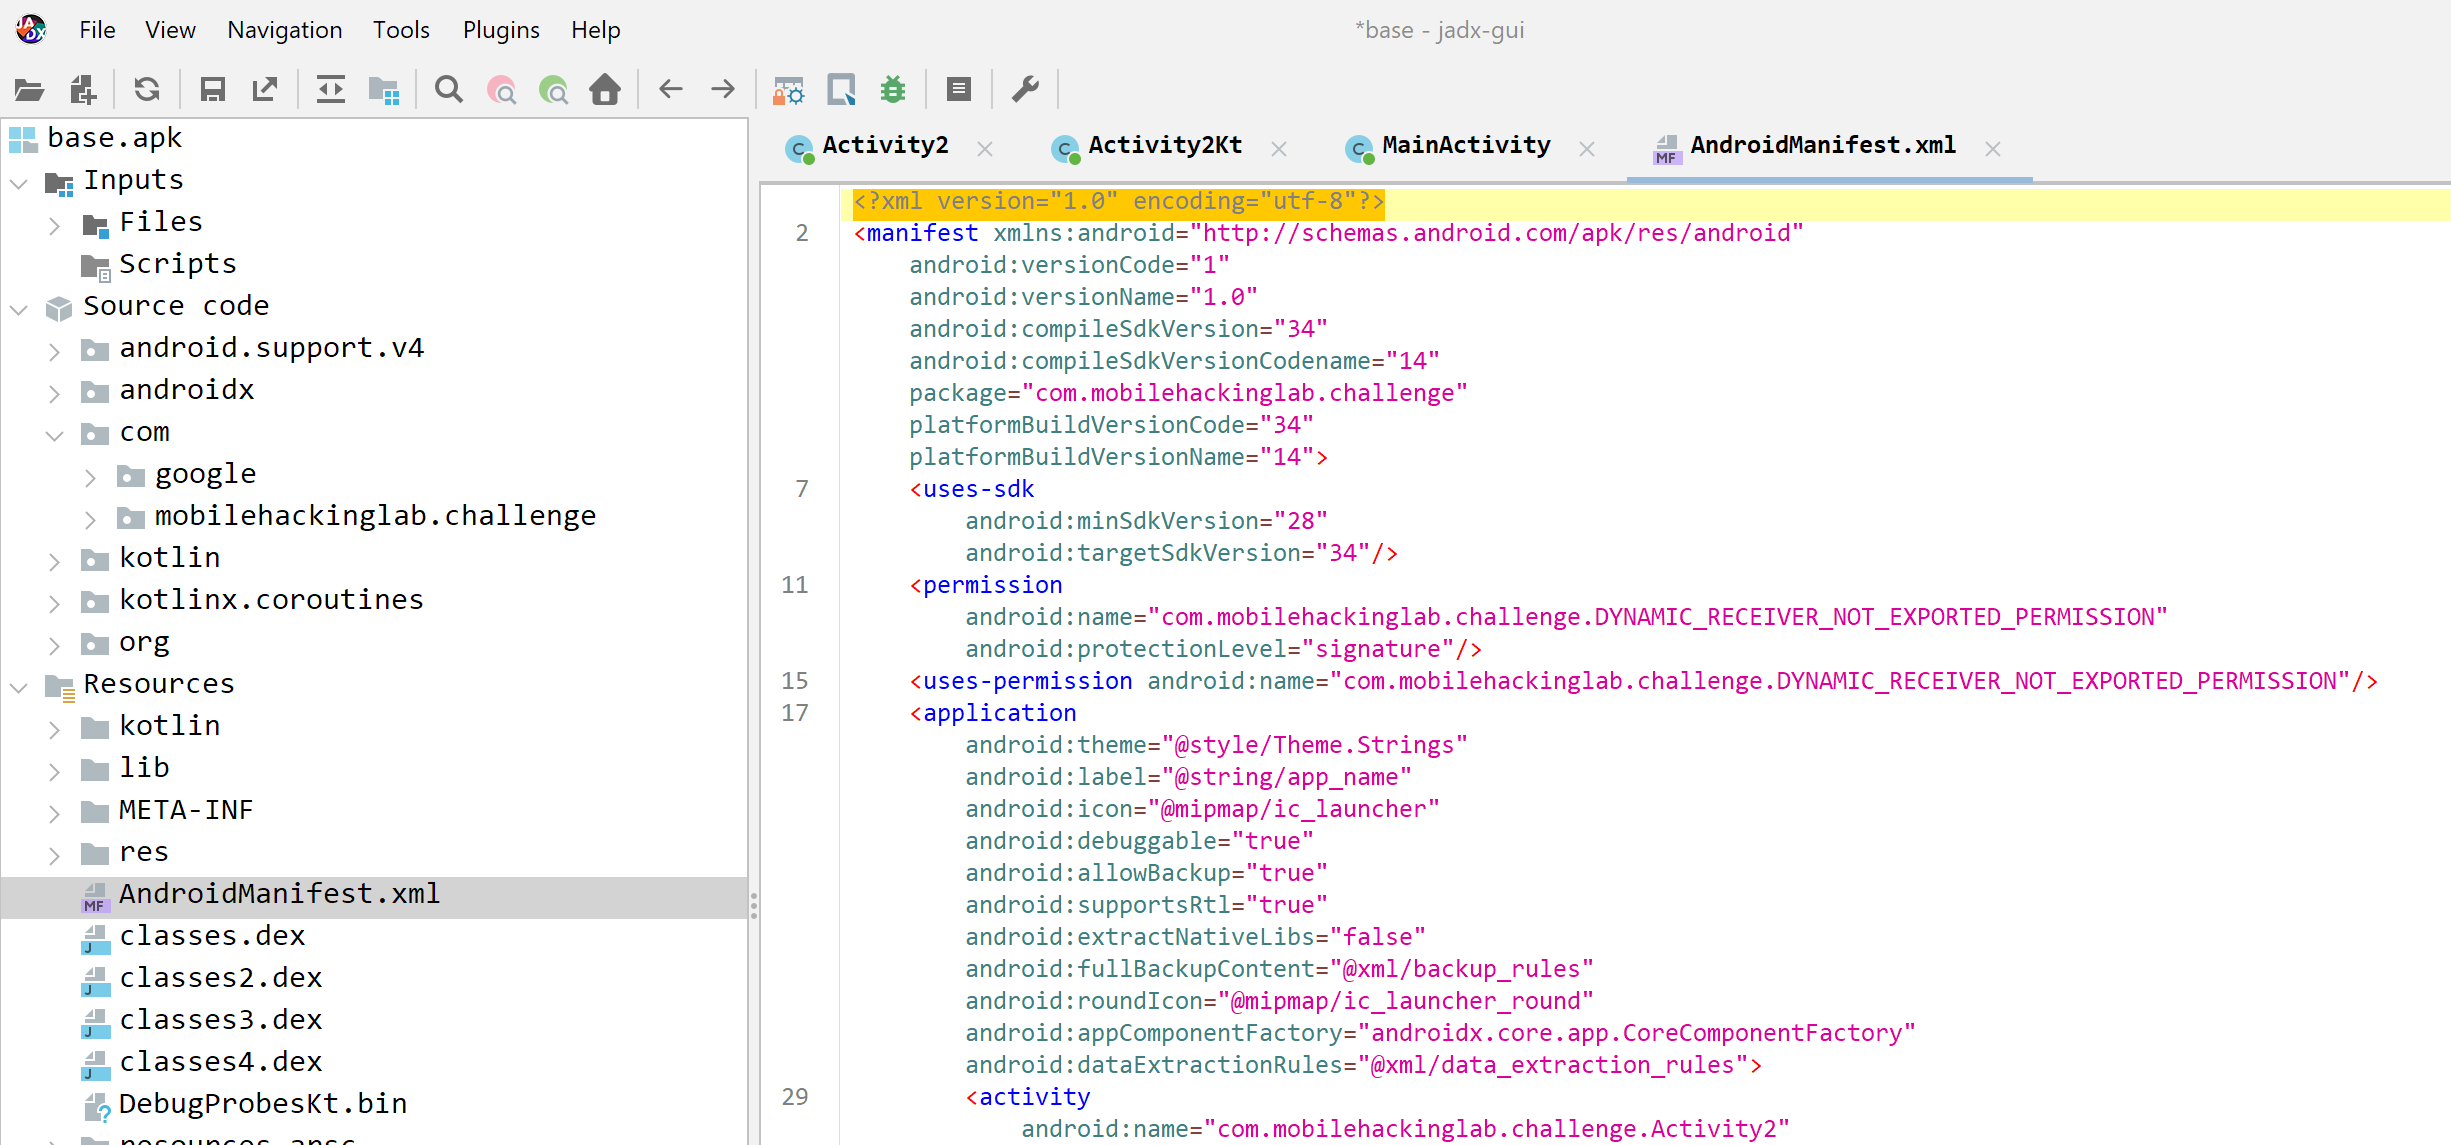
First off, lets have a look at the ApplicationManifest.XML this is where the information about exported components can be found. Quickly we can see that there are two Activities that have been explicitly exported. These are the MainActivity and Activity2
Lets look closer at Activity2 and seems fairly obvious that this is the target.
<activity
            android:name="com.mobilehackinglab.challenge.Activity2"
            android:exported="true">
            <intent-filter>
                <action android:name="android.intent.action.VIEW"/>
                <category android:name="android.intent.category.DEFAULT"/>
                <category android:name="android.intent.category.BROWSABLE"/>
                <data
                    android:scheme="mhl"
                    android:host="labs"/>
            </intent-filter>
</activity>
Exploiting exported activities can be done in a lab environment by using ADB. To exploit in the wild you would need to create a malicious application. Lets go the easy route for now…
adb shell am start com.mobilehackinglab.challenge/.Activity2
However this doesn’t seem to start the activity. Lets have a further look at what is required. There is a data section which probably needs to be added.
Some research shows this is in the format of <scheme>://<host>:<port>[<path>|<pathPrefix>|<pathPattern>|<pathAdvancedPattern>|<pathSuffix>]
So that would be mhl::/labs
Lets update our request and see if we can get something working…
adb shell am start -d "mhl://labs" -n com.mobilehackinglab.challenge/.Activity2

Well success, kind of. We can see that it has successfully started the intent, but nothing seems to happen on the screen and the application closes.
Activity2 Code
Lets have a closer look at what is going on within Activit2 now we can get it running. There seem to be three functions.
- onCreate()
- decrypt()
- cd()
- getflag()
Lets examine the onCreate function first as this is the one that is called when the activity is launched.
public void onCreate(Bundle savedInstanceState) {
        super.onCreate(savedInstanceState);
        setContentView(R.layout.activity_2);
        SharedPreferences sharedPreferences = getSharedPreferences("DAD4", 0);
        String u_1 = sharedPreferences.getString("UUU0133", null);
        boolean isActionView = Intrinsics.areEqual(getIntent().getAction(), "android.intent.action.VIEW");
        boolean isU1Matching = Intrinsics.areEqual(u_1, cd());
        if (isActionView && isU1Matching) {
            Uri uri = getIntent().getData();
            if (uri != null && Intrinsics.areEqual(uri.getScheme(), "mhl") && Intrinsics.areEqual(uri.getHost(), "labs")) {
                // Truncated for now
Looking at the code we can see that first an instance of sharedPreferences are created and it is looking for a SharedPreference called “DAD4” and a value with key “UUU0133”. After that two booleans are created, the first is true if the Action submitted is “android.intent.action.VIEW” and the second if the value in the sharedPreference is equal to the output of cd()
If both of these output as true then it will check the uri we submitted and progress with the function code. If not it will quit the application. We can control the Action that is submitted but currently we have no idea about the sharedPreferences and the cd function.
Lets check what is going on in the cd() function.
private final String cd() {
        String str;
        SimpleDateFormat sdf = new SimpleDateFormat("dd/MM/yyyy", Locale.getDefault());
        String format = sdf.format(new Date());
        Intrinsics.checkNotNullExpressionValue(format, "format(...)");
        Activity2Kt.cu_d = format;
        str = Activity2Kt.cu_d;
        if (str != null) {
            return str;
        }
        Intrinsics.throwUninitializedPropertyAccessException("cu_d");
        return null;
    }
This looks to be fairly simple it gets the current date and formats it as dd/MM/YYYY and returns it. We can check this by doing a little dynamic analysis.
Dynamic Analysis of Activity2
First we need to start the application. We can do this on the mobile device or we can do it using frida, it doesn’t matter too much which yet.
Lets start by tracing the Activity2 onCreate, decrypt and any cd functions and see what is going on.
frida-trace -U Strings -j "com.mobilehackinglab.challenge.Activity2!onCreate*" -j "com.mobilehackinglab.challenge.Activity2!decrypt -j "*!cd"

However, for some reason it hasn’t found any functions to trace. This is because it can only hook functions that have been already been loaded by the application. As Activity2 hasn’t been loaded yet there is nothing to hook. So lets close that for now.
No Quitting
So we want to see what is going on in the Activity2 activity, but the first function that is called performs some checks and calls System.exit(0); if any of them fail. To get around this we need to try and stop the application from quitting.
We can do this by using a frida script to hook the Java.Lang.System.exit() function so that it doesn’t actually quit when called.
Java.perform(function () {

    send("Placing Java hooks...");
    var sys = Java.use("java.lang.System");
    sys.exit.overload("int").implementation = function(var_0) {
        send("java.lang.System.exit(I)V  // We avoid exiting the application  :)");
    };

    send("Done Java hooks installed.");

});
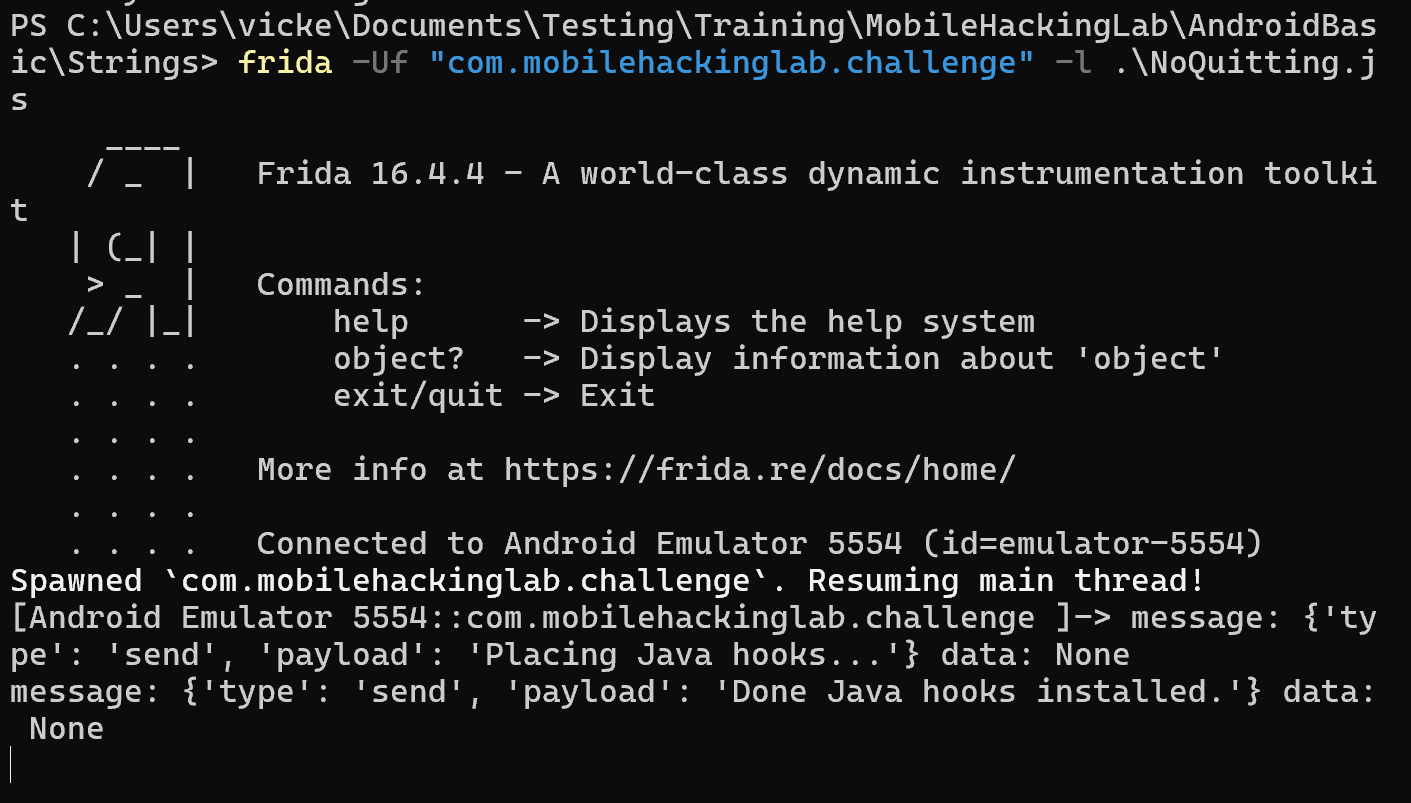
Now lets send the ADB request again to ensure the Activity2 has been loaded and restart frida-trace.
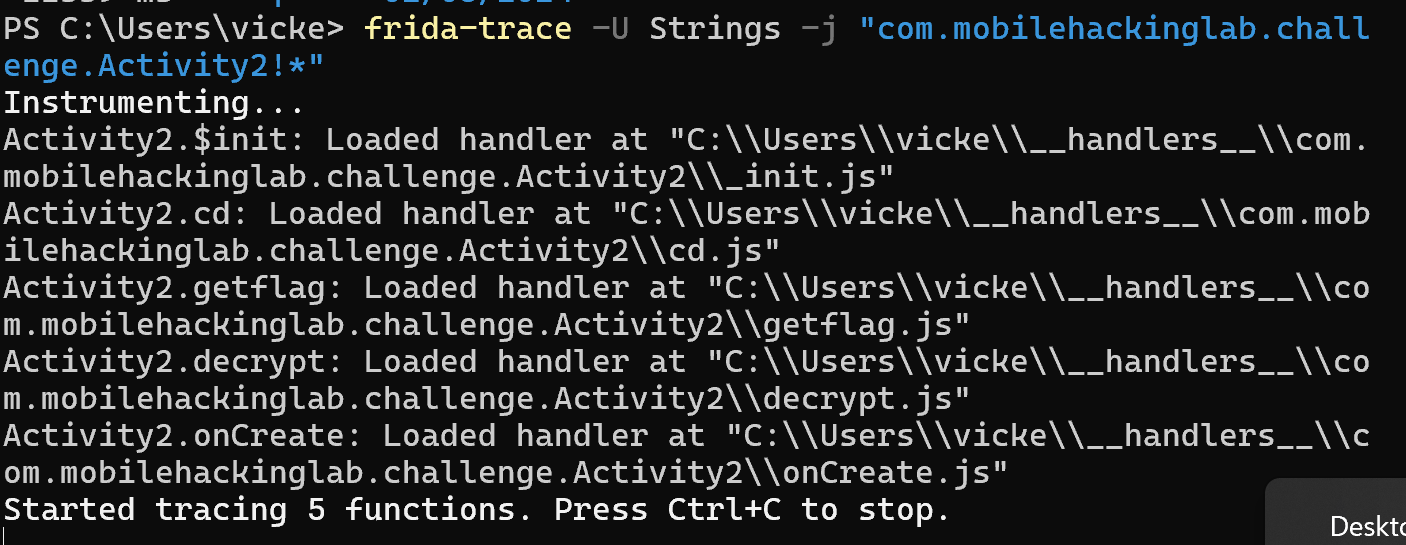
We can see that that 5 functions have been hooked. (Note: I changed the trace to just hook every function in Activity2 for ease)
Now send the ADB request to start Activity2 again as we have trace up and running.

We can see that it has been successfull and a number of calls have been made. In particular we can see that the onCreate() function has been automatically called at the start. This makes a call the cd() function which responds with the date in the format we expected.
Success :-)
SharedPreferences
So we can now successfully instrument Activity2 and know that the the output of cd() is the current date which is compared against the UUU0133 key value in the DAD4 shared preference file.
A bit of research shows us that shared preferences are stored in the /data/data/appName/sharedPreferences folder on the device. An easy way to check is to have a look and see what is there….

And yeah, doesn’t look like there is anything there. So the check is always going to fail. We could manually make one and add it to the device as we have control but that feels a little like cheating. So lets dig a little further and see what else we can find.
Examining the MainActivity source code in JADX we can see that there is an interesting function called KLOW()
public final void KLOW() {
        SharedPreferences sharedPreferences = getSharedPreferences("DAD4", 0);
        SharedPreferences.Editor editor = sharedPreferences.edit();
        Intrinsics.checkNotNullExpressionValue(editor, "edit(...)");
        SimpleDateFormat sdf = new SimpleDateFormat("dd/MM/yyyy", Locale.getDefault());
        String cu_d = sdf.format(new Date());
        editor.putString("UUU0133", cu_d);
        editor.apply();
    }
This function creates a sharedPreference called DAD4 and stores the current date in a key called UUU0133 which is exactly what we are after. Surprising that…
So we need to call the KLOW function so that it is created. This can be done with a short Frida script. This script checks for a valid instance of MainActivity, if found it calls the KLOW() function.
Java.perform(function () {
    Java.choose("com.mobilehackinglab.challenge.MainActivity" , {
      onMatch : function(instance){
        console.log ("Instance of MainActivity Found");
        console.log("Calling Klow " + instance.KLOW());
      },
      onComplete:function(){}
    });
});
Start an instance of Strings in Frida CLI, startup frida-trace to see what is going on, then load the frida script to call Klow()
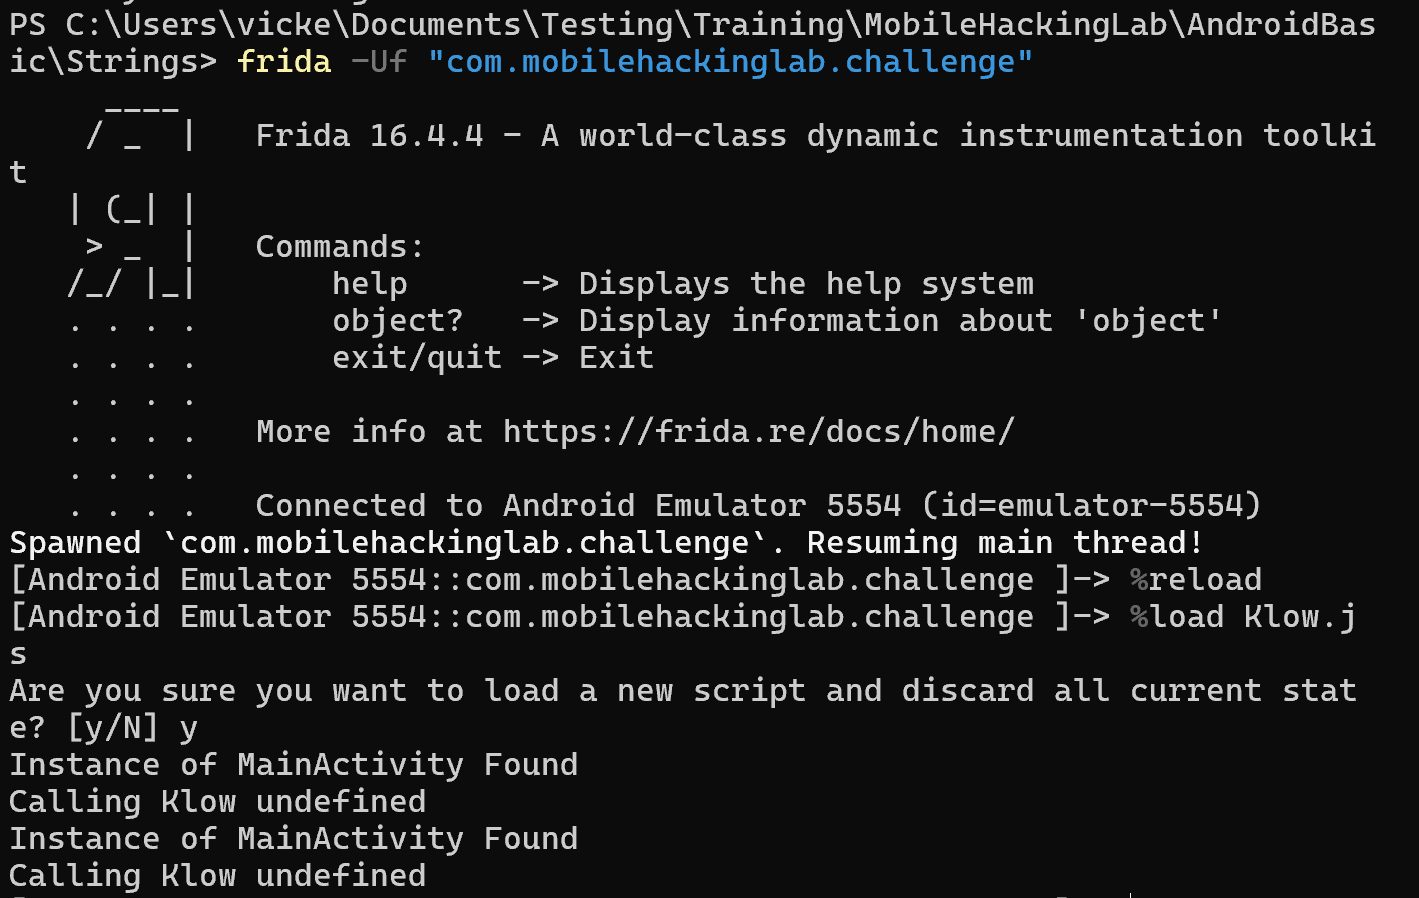
Check the trace and see if it has logged anything…
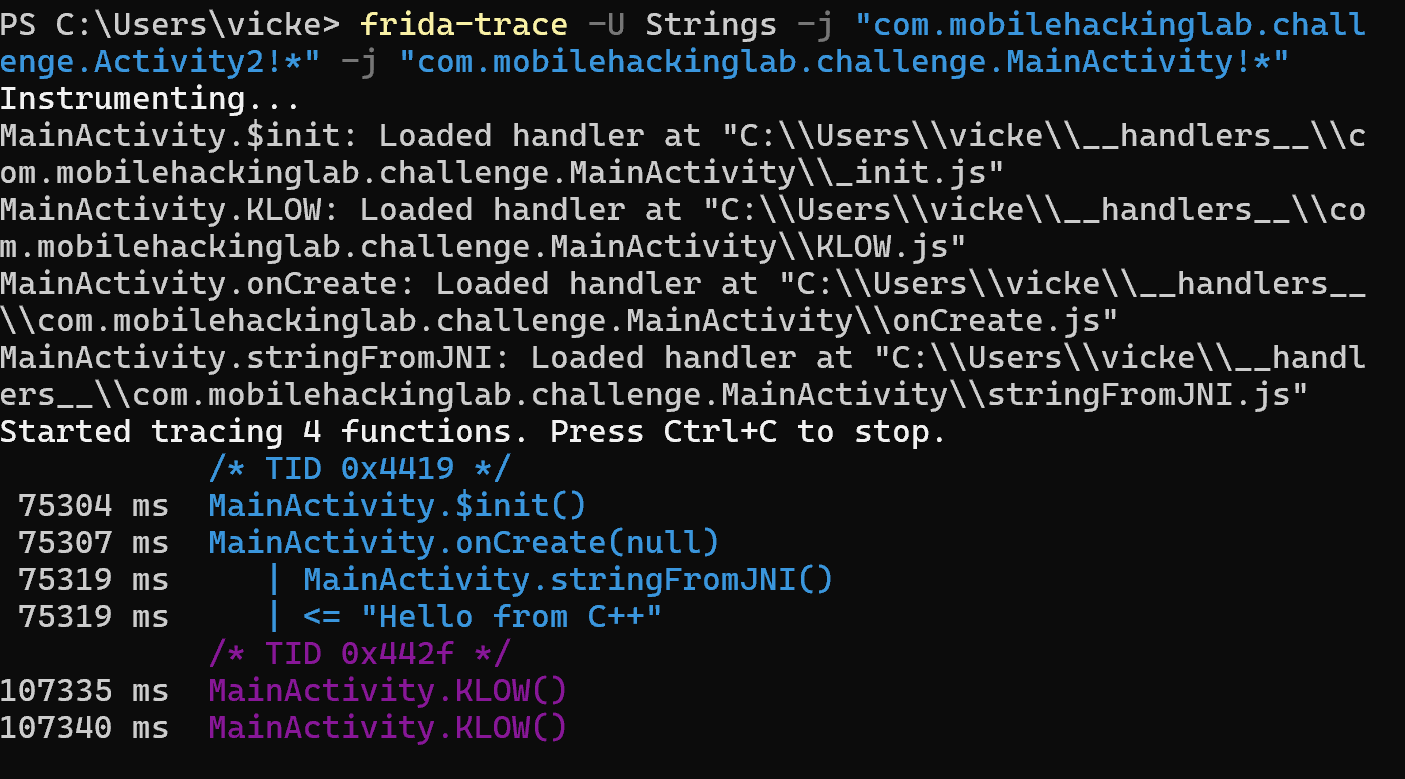
Success, we can see that the KLOW function has been called. (I’m sure there is an easier method, but my Frida skills aren’t there yet)
Lastly we can check that the SharedPreference has been created by checking the device again.

Decryption Key
So we can control everything we need to get to the main meat of the onCreate() function. Lets see what is there…
if (uri != null && Intrinsics.areEqual(uri.getScheme(), "mhl") && Intrinsics.areEqual(uri.getHost(), "labs")) {
                String base64Value = uri.getLastPathSegment();
                byte[] decodedValue = Base64.decode(base64Value, 0);
                if (decodedValue != null) {
                    String ds = new String(decodedValue, Charsets.UTF_8);
                    byte[] bytes = "your_secret_key_1234567890123456".getBytes(Charsets.UTF_8);
                    Intrinsics.checkNotNullExpressionValue(bytes, "this as java.lang.String).getBytes(charset)");
                    String str = decrypt("AES/CBC/PKCS5Padding", "bqGrDKdQ8zo26HflRsGvVA==", new SecretKeySpec(bytes, "AES"));
                    if (str.equals(ds)) {
                        System.loadLibrary("flag");
                        String s = getflag();
                        Toast.makeText(getApplicationContext(), s, 1).show();
                        return;
We have passed the initial checks, now it verifies that the the scheme is mhl, the host is labs. Got that bit already.
Next it takes the last part of the path segment and base64 decodes it. Decrypts the hardcoded key bqGrDKdQ8zo26HflRsGvVA== using the included secret key your_secret_key_1234567890123456 by calling decrypt().
 public final String decrypt(String algorithm, String cipherText, SecretKeySpec key) {
        Intrinsics.checkNotNullParameter(algorithm, "algorithm");
        Intrinsics.checkNotNullParameter(cipherText, "cipherText");
        Intrinsics.checkNotNullParameter(key, "key");
        Cipher cipher = Cipher.getInstance(algorithm);
        try {
            byte[] bytes = Activity2Kt.fixedIV.getBytes(Charsets.UTF_8);
            Intrinsics.checkNotNullExpressionValue(bytes, "this as java.lang.String).getBytes(charset)");
            IvParameterSpec ivSpec = new IvParameterSpec(bytes);
            cipher.init(2, key, ivSpec);
            byte[] decodedCipherText = Base64.decode(cipherText, 0);
            byte[] decrypted = cipher.doFinal(decodedCipherText);
            Intrinsics.checkNotNull(decrypted);
            return new String(decrypted, Charsets.UTF_8);
        } catch (Exception e) {
            throw new RuntimeException("Decryption failed", e);
        }
    }
This is just a fairly simple AES decryption function. We have the encrypted passphrase already, the key and if we look closer we can see there is a fixed IV which is returned by Activity2k.fixedIV

If we put that together we have the following:
Encrypted Pass Phrase: “bqGrDKdQ8zo26HflRsGvVA==” Secret Key: “your_secret_key_1234567890123456” IV: “1234567890123456”
Lets put this into CyberChef and decrypt it.
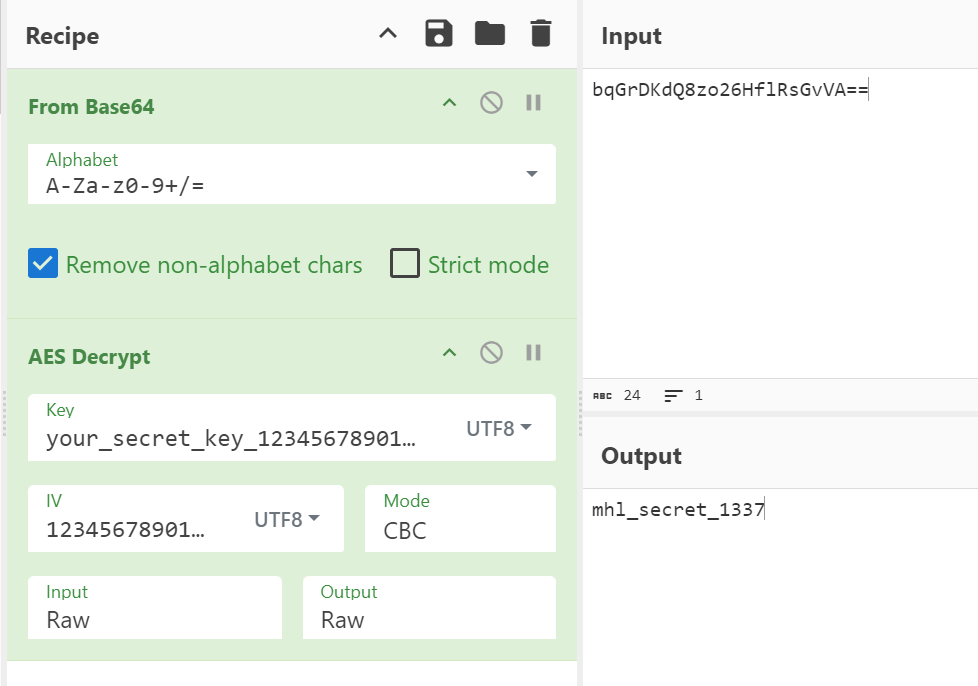
And we get the passphrase which is “mhl_secret_1337” (don’t forget to base64 encode it again when we send it)
Putting the exploit together
We have the the correct sharedPreferences, we know the action that needs to be sent and have the correct key.
Lets put this together into an ADB request.
adb shell am start -a android.intent.action.VIEW -d "mhl://labs/bWhsX3NlY3JldF8xMzM3" -n com.mobilehackinglab.challenge/.Activity2

Looks good, now lets see what is happening in the trace.
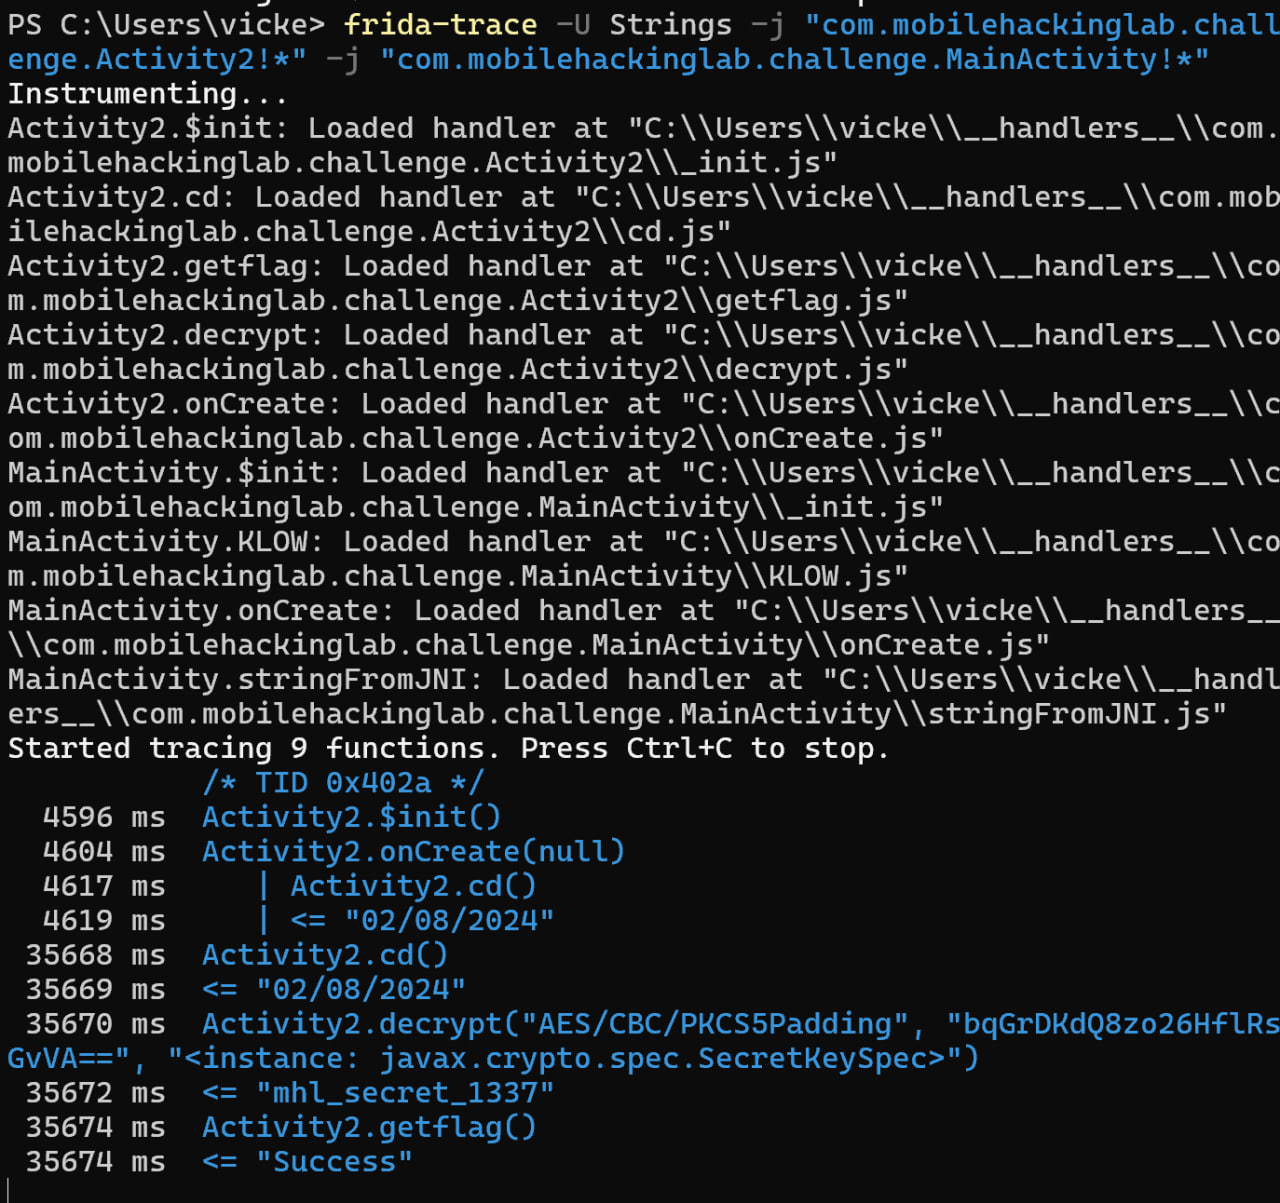
We can see that the onCreate() function has been called followed by the cd() as before. However, we now have a bit more going on as we have passed the required checks to move forward in the code. Next up is the decrypt function which decrypts the hardcoded key to “mhl_secret_1337” which is what we had, as the two match one final function is called which is getFlag() which returns success.
Huh but we don’t actually seem to have a flag??
Getting the flag
We’ve come all that way but can’t see the flag? What is going on here?
if (str.equals(ds)) {
                        System.loadLibrary("flag");
                        String s = getflag();
                        Toast.makeText(getApplicationContext(), s, 1).show();
                        return;
Taking a look at the code again. We can see that if the decrypted passwords are the same a library called flag is loaded, the getflag function is called and a toast is displayed saying success.
We were given a hint in the brief that the flag might be in memory and is in the structure of MHL{xxx}. So probably is contained in the flag library that has just been loaded.
We need to be able to search the memory for the required flag. I’ve found two ways to do this.
The first is easy. Load the Strings app up using the Objection tool which is a wrapper round frida and provides a lot of automation. We can then call the Activity using ADB as before and see that the success toast has appeared on the screen.
Objection has a nice function called Memory Search. Where we can give it a string and it will search for it. Lets run that with the string MHL{ and see what is returned.

Well that was easy, we can see that the flag was returned as `MHL{IN_THE_MEMORY}
There is a slightly different way of doing this, we can use Frida scripts to perform the search. As the aim of this is to learn new skills lets give it a try.
First we need to actually confirm the library we want to search. Have a look at the application again in JADX and we can see there is a library called libflag which seems likely.
var m = Process.findModuleByName("libflag.so");

var pattern = "4D 48 4C 7B" //string to scan forMHL{}
var res = Memory.scan(m.base, m.size, pattern , {
    onMatch: function(address, size) {
        console.log ('Result Found at address: '+ address)},
    onError: function(reason) {
        console.log('Error: ' + reason)
    },
    onComplete: function()
    {
        console.log('Search complete')
    }

});

const results = Memory.scanSync(m.base, m.size, pattern);
      console.log("Result:" + JSON.stringify(results));
      const flag_addr = results[0].address;
      console.log(hexdump(flag_addr,{length: 30}));
So here the script searches for the libflag.so module, sets the search pattern of MHL{ in hex, sets the area to search and prints out address. A second function at the bottom takes the results outputed using the scanSync function, looks them up from the addresses found and prints out.
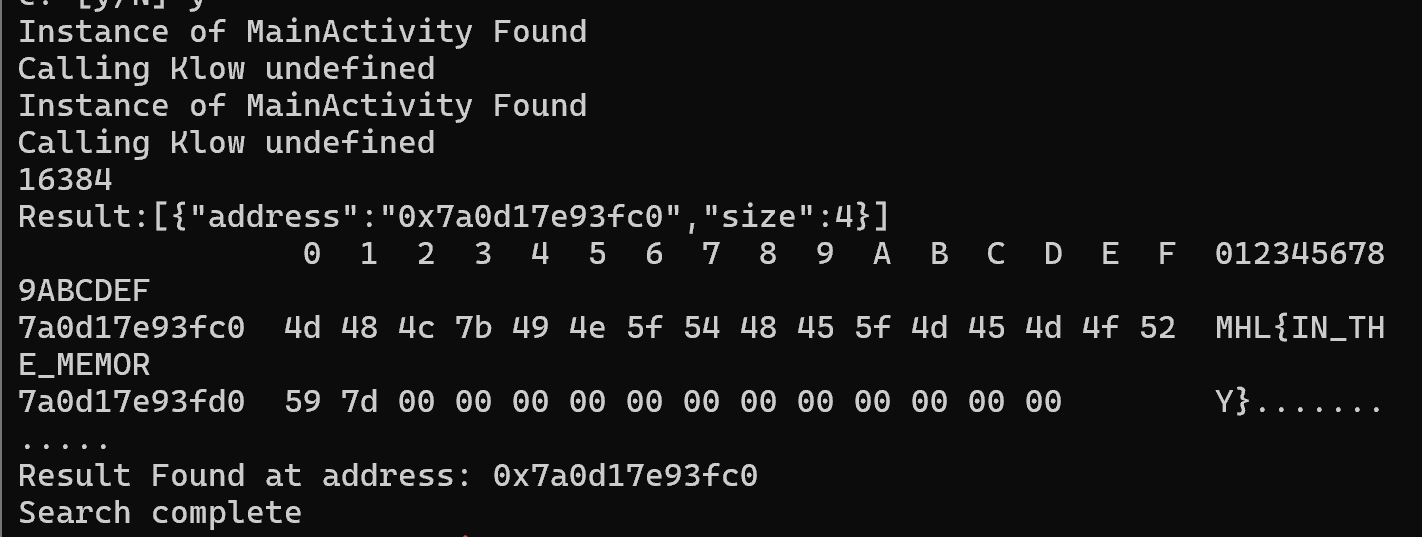
As we can see we have the same output and have succesfully completed the lab.
